Dispatcher
Dispatcher
The Dispatcher enables gasless and signless transactions (transactions without signing any approval modals) in your Lens app.
Blockchain technology introduced many drawbacks like wallet popups, seed phrases, passwords, funds, and multi-network (blockchain) dynamics. These are fundamental for securing cryptographic transactions but present many UX challenges. So, are we doomed, or should we be optimistic?
In blockchain terms, Optimistic means that we assume the transaction will come through so we don't need to wait for validators to reach a consensus. This wouldn't be acceptable for financial transactions because of the double spending problem but can be helpful for social media interactions.
Social media is about great frontend experiences so having wallet prompts for every share or follow is not ideal. The challenge is that being optimistic in a front-end experience is possible but still, every action must be approved by the user wallet.
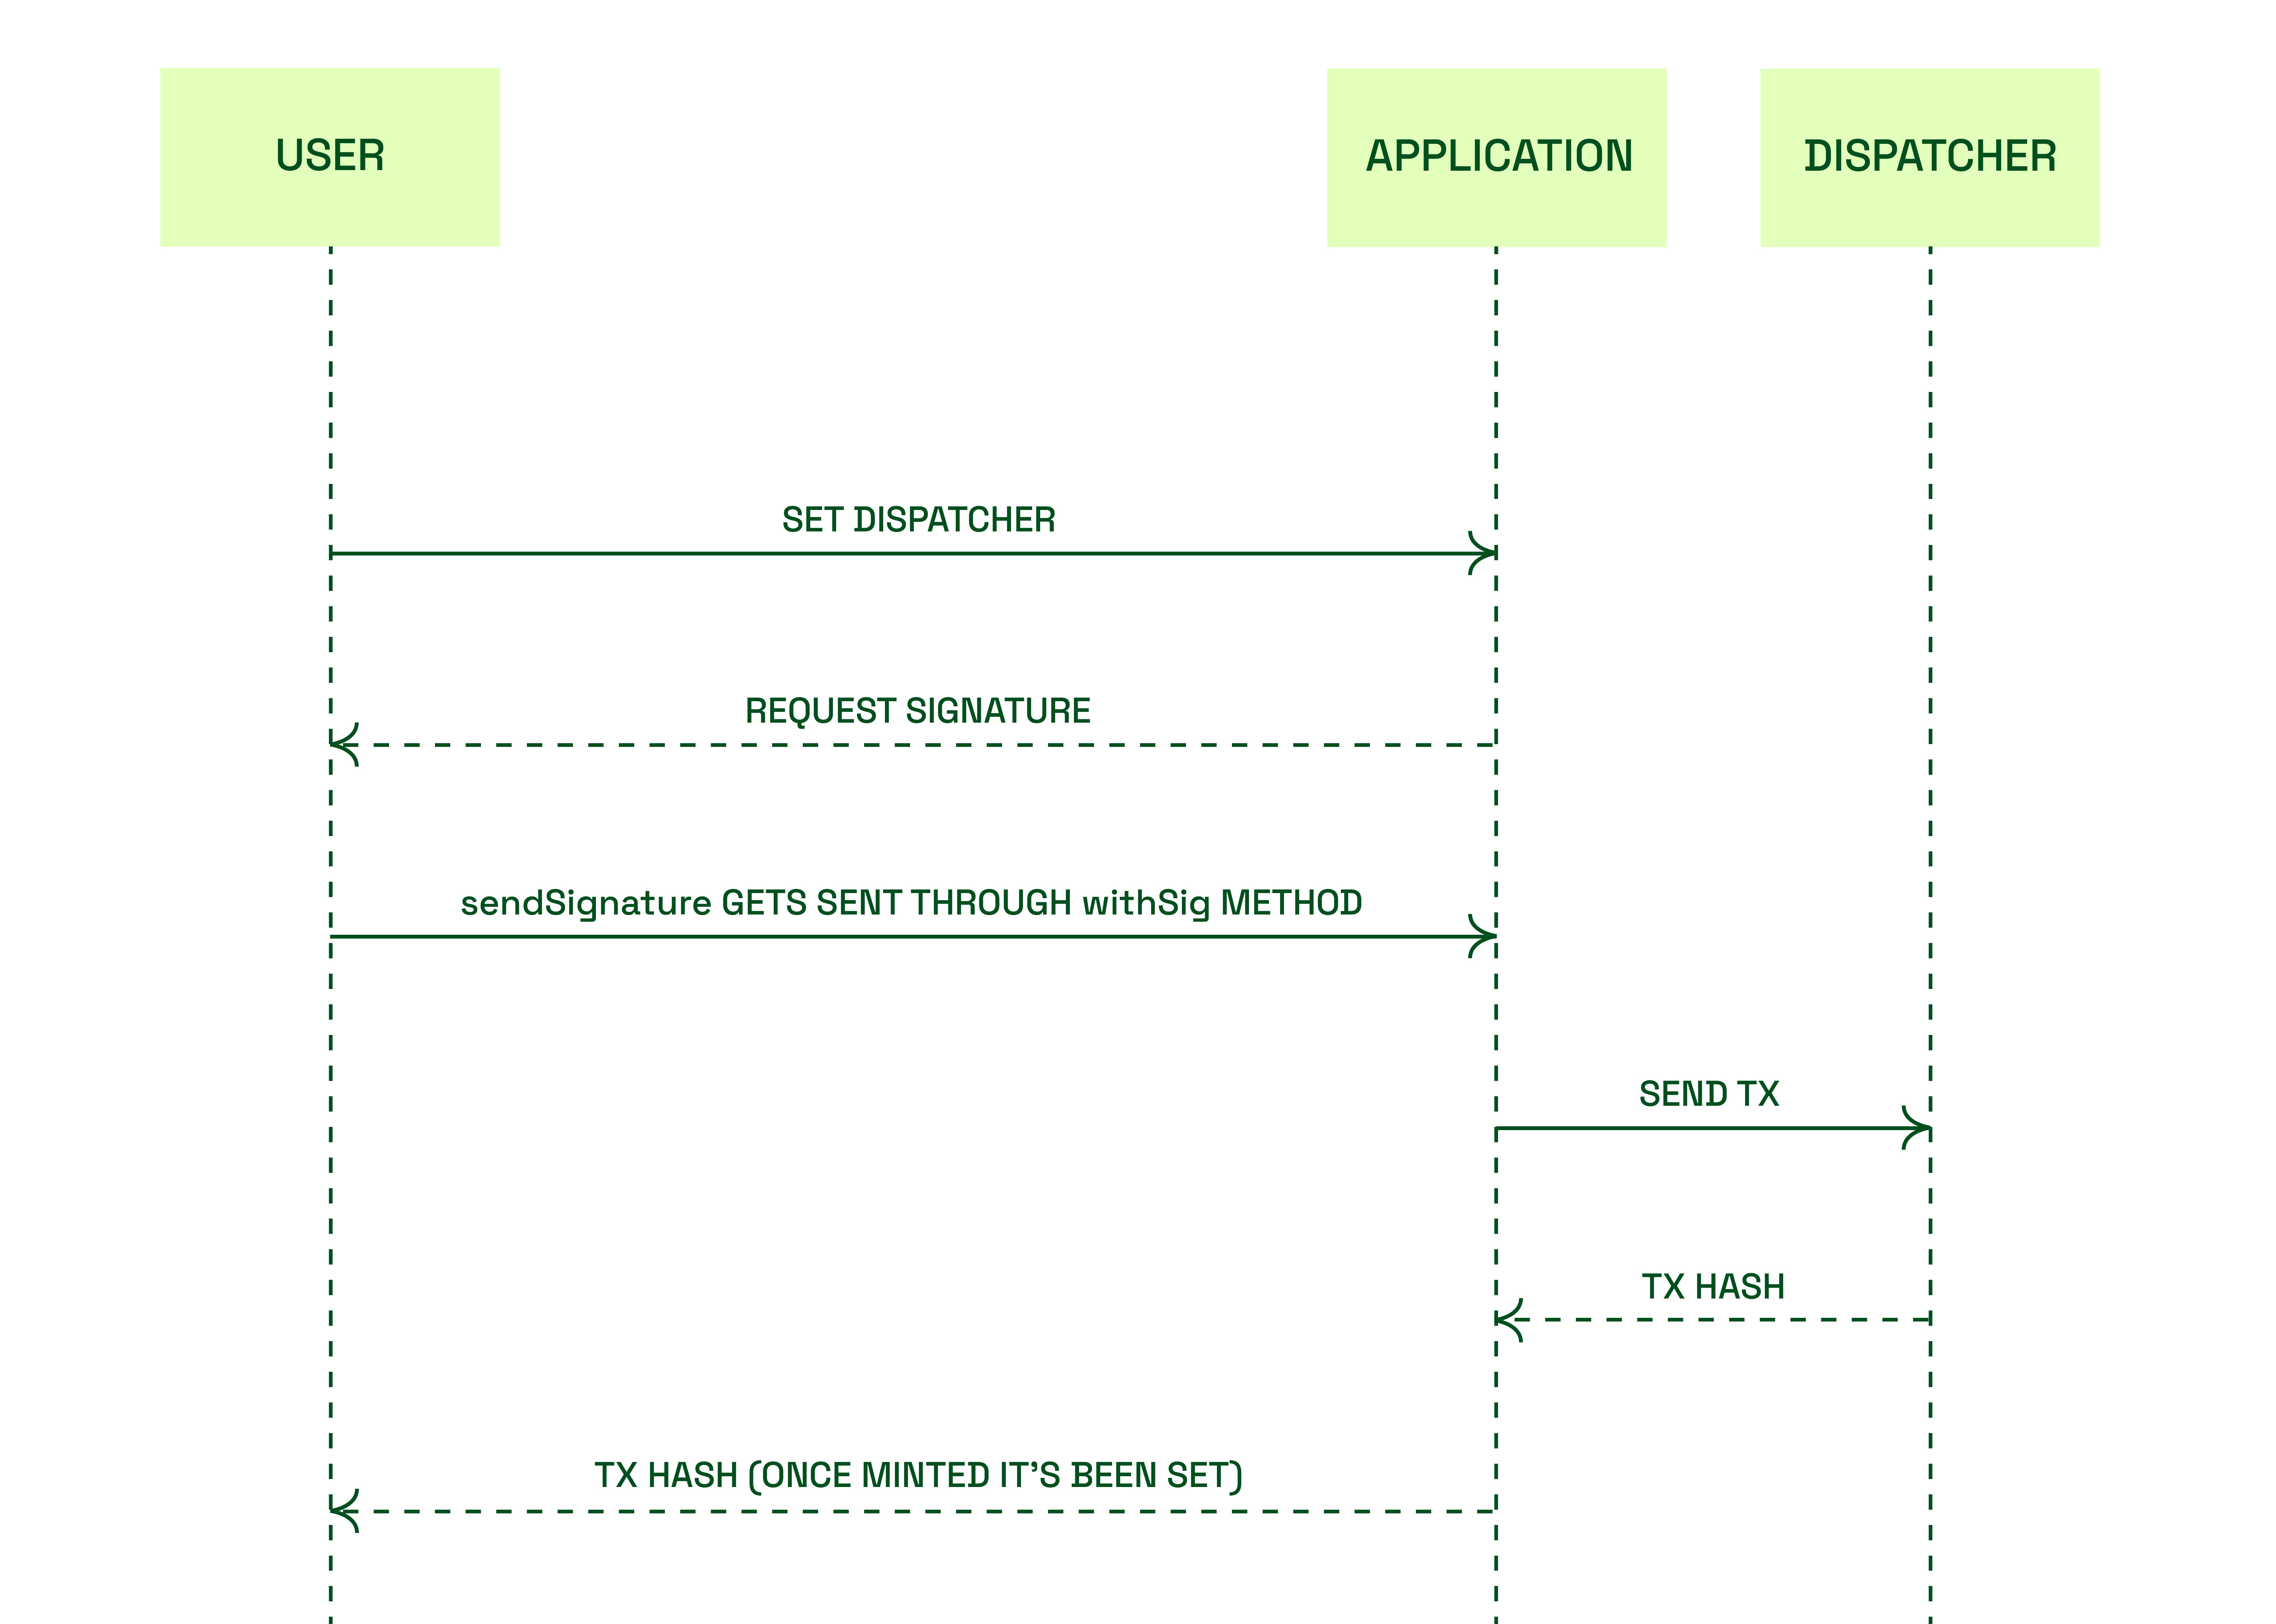
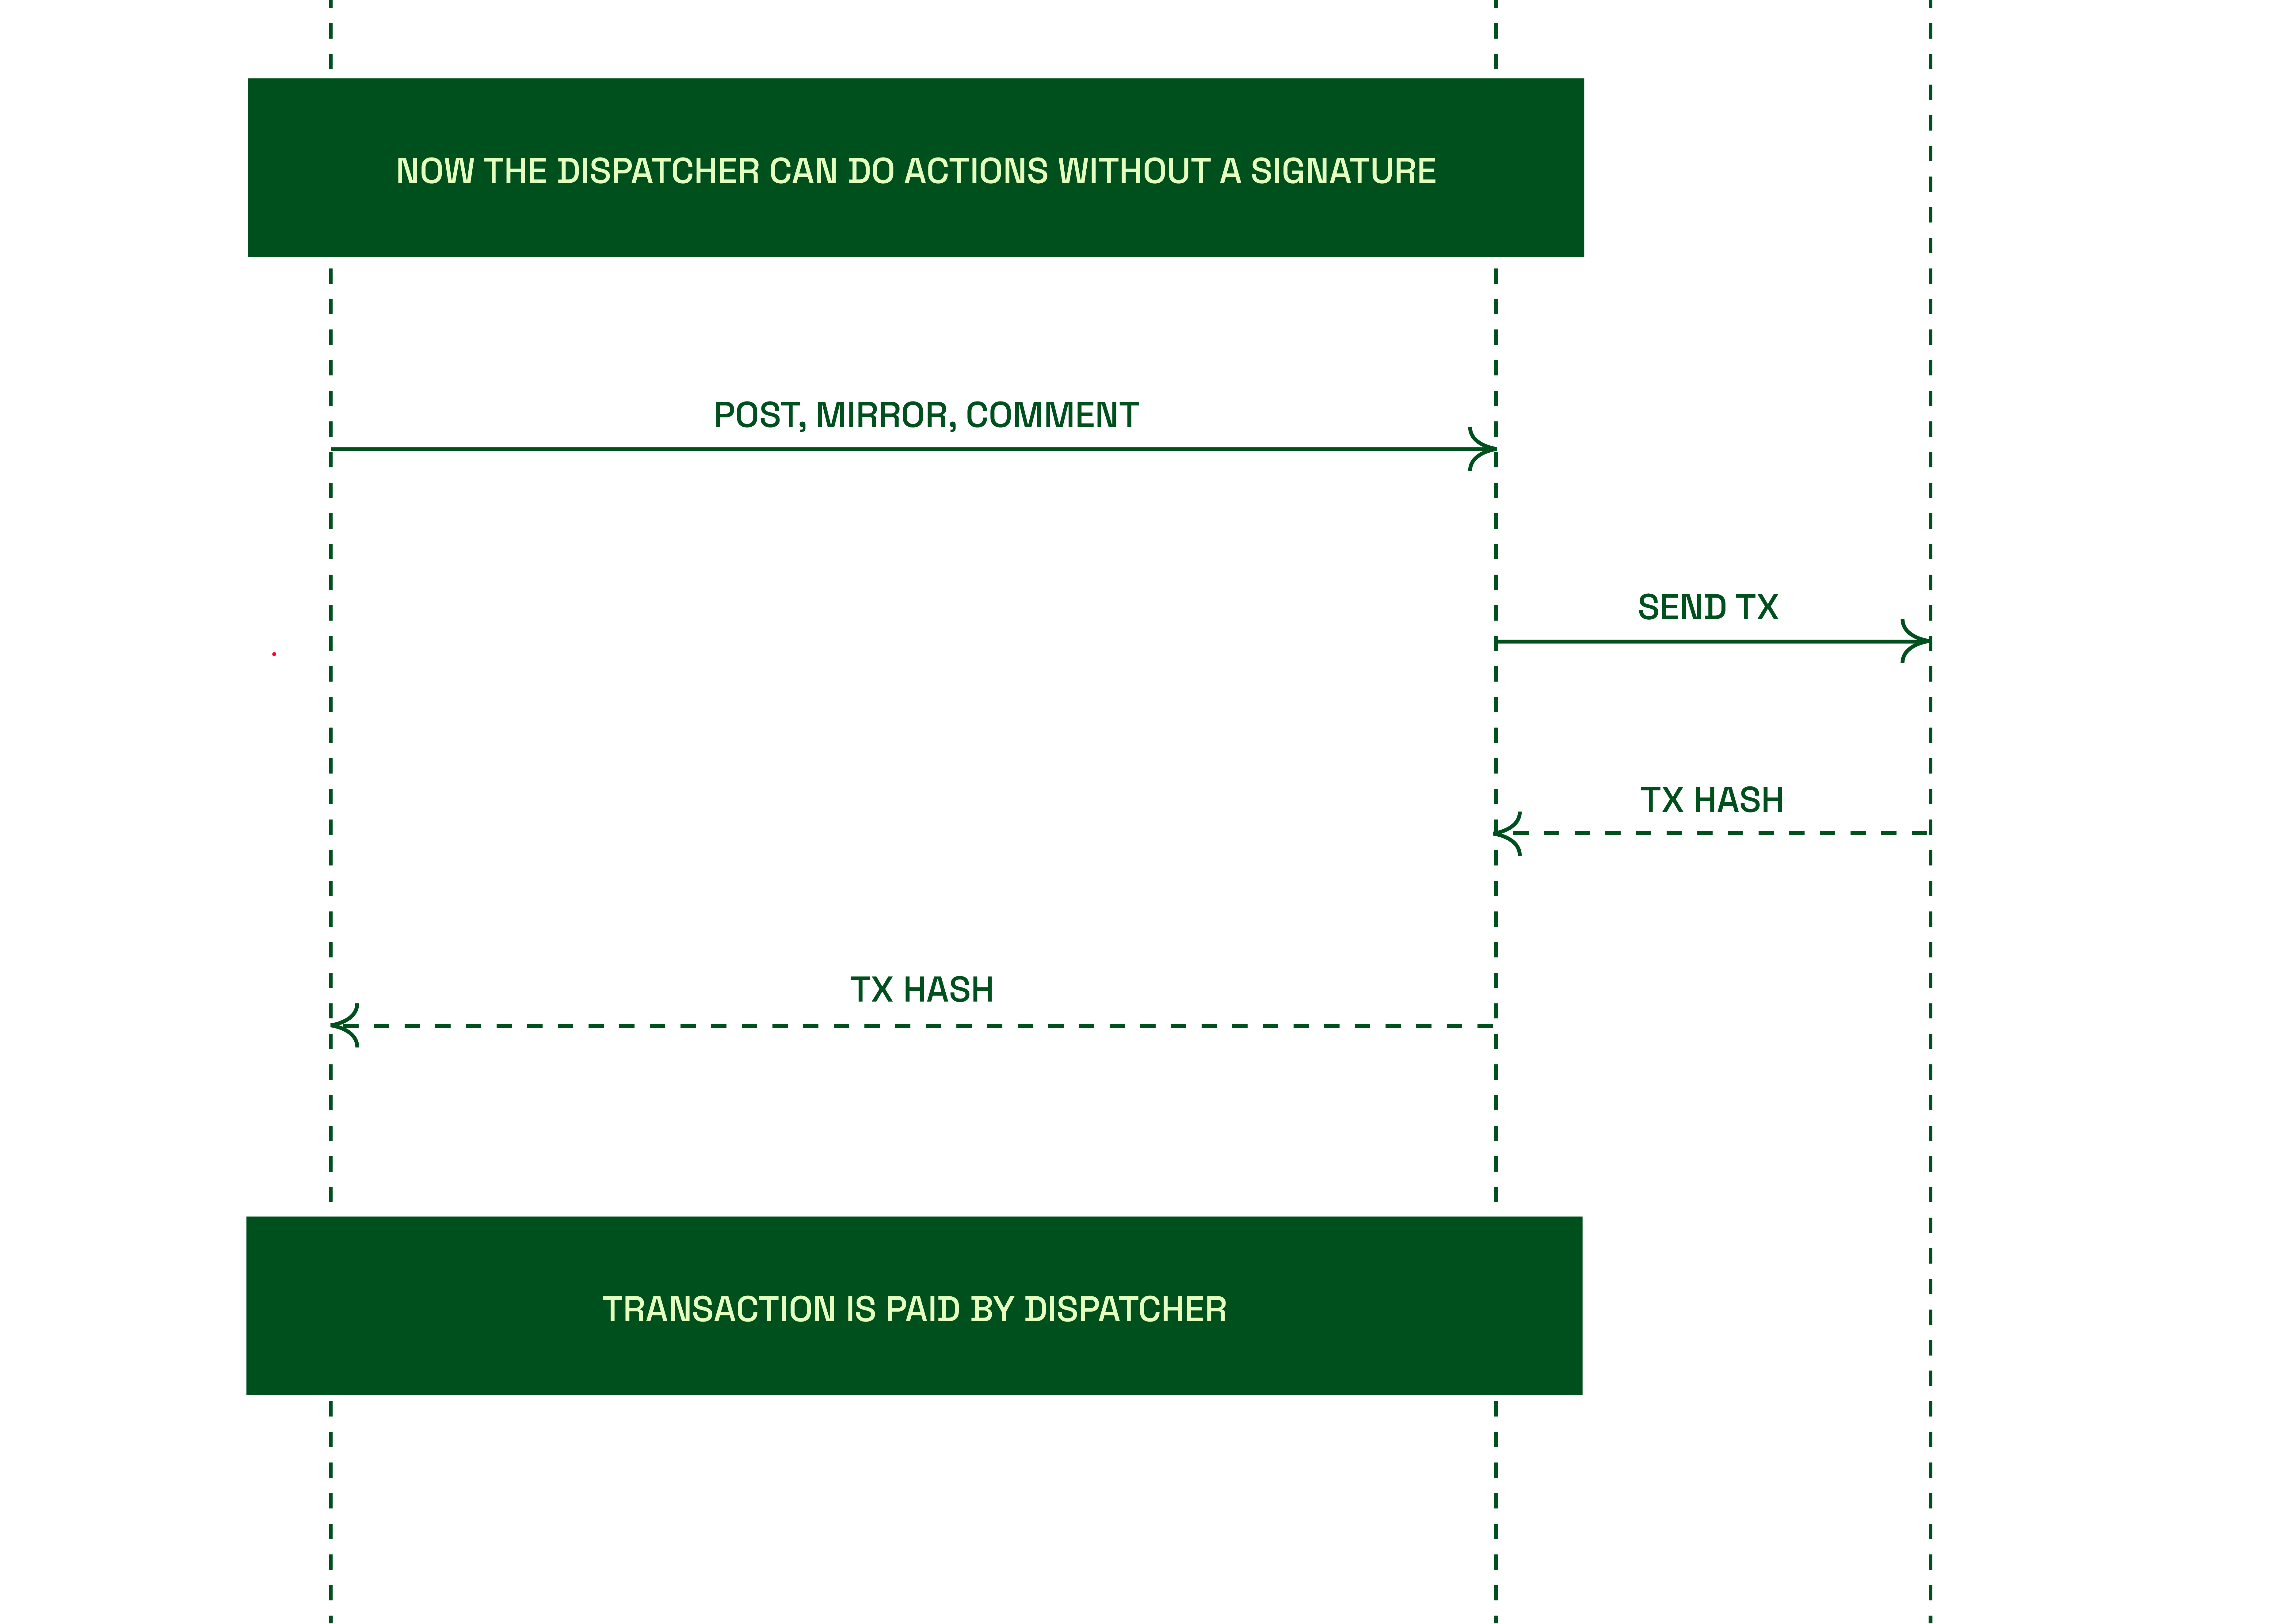
To solve this issue, we created the Dispatcher. Basically, it is an intermediate wallet with funds that act as the signer for every transaction. We only have to delegate signing privileges to this dispatcher wallet which operates hidden in the backend. This combined with an optimistic UI creates a seamless experience identical to what we are used to today.
Security
Dispatcher only works for post, comment, mirror, set profile metadata and set profile image.
Dispatcher examples
Post - https://docs.lens.xyz/docs/create-post-typed-data#gasless
Comment - https://docs.lens.xyz/docs/create-comment-typed-data#gasless
Mirror - https://docs.lens.xyz/docs/create-mirror-typed-data#gasless
Profile metadata - https://docs.lens.xyz/docs/create-set-update-profile-metadata-typed-data#gasless
Profile image - https://docs.lens.xyz/docs/create-set-profile-image-uri-typed-data#gasless
How to know if a user has a dispatcher on
You can use the withSig methods and go through the broadcast logic to keep transactions gasless but that still requires a signature. The dispatcher is an opt-in step so you can check if a profile has a dispatcher on by doing:
query Profile {
  profile(request: { profileId: "0x18" }) {
    dispatcher {
      address
      canUseRelay
    }
  }
}
{
  "data": {
    "profile": {
      "dispatcher": {
        "address": "0x6C1e1bC39b13f9E0Af9424D76De899203F47755F",
        "canUseRelay": true
      }
    }
  }
}
If the canUseRelay is true this means they can use the built-in dispatcher on the API. Remember profiles could have mapped to another dispatcher which is not the lens API one so if it is false you can not do dispatcher transactions through the API. You would have to prompt the user to move over to ours which is described below. Also, note that dispatcher can not be set at all if so it will be dispatcher: null
WithSig methods
As a dispatcher can only use a subset of methods this doesn't mean you can not be gasless for everything. Any withSig methods can go through the relay. On each document, if that logic can go through the broadcast it will state it to make it very clear for you.
Set dispatcher
Full code example
Disable - https://github.com/lens-protocol/api-examples/blob/master/src/dispatcher/disable-dispatcher.ts
Enable - https://github.com/lens-protocol/api-examples/blob/master/src/dispatcher/enable-dispatcher.ts
This API call allows you to get the typed data to then call the withSig method to set a dispatcher for your Lens profile.
Dispatcher allows another address to post, comment, mirror, set follow module and change the profile picture on behalf of you using their wallet
This request is protected by authentication
hint: this means it requires an x-access-token header put in the request with your authentication token.
Typed data is a way to try to show the users what they are signing in a more readable format. You can read more about it here.
Constructing that type of data is normally difficult. On the type data, you also need to get the nonce, deadline, contract version, contract address, chain id, and the name of the contract for the signature to be able to be signed and verified.
When using this API the server checks every detail before it generates the typed data. For example: if you try to create typed data on an always failing transaction the server will throw an error in a human-readable form. This is great for debugging but also saves issues with users sending always failing transactions or a mismatch of a bad request.
We will show you the typed data approach using ethers and the API side by side. Keep in mind that with the typed data approach you use the withSig methods which can be called by you with your signature or with that signature any relay could call it for you on your behalf allowing gasless transactions.
API Design
mutation CreateSetDispatcherTypedData {
  createSetDispatcherTypedData(request:{
    profileId: "0x1d",
    dispatcher: "0xdfd7D26fd33473F475b57556118F8251464a24eb"
  }) {
    id
    expiresAt
    typedData {
      types {
        SetDispatcherWithSig {
          name
          type
        }
      }
      domain {
        name
        chainId
        version
        verifyingContract
      }
      value {
        nonce
        deadline
        profileId
        dispatcher
      }
    }
  }
}
{
  "data": {
    "createSetDispatcherTypedData": {
      "id": "1c0829c0-94d9-4ca8-938e-61f87a73c811",
      "expiresAt": "2022-02-18T15:45:17.000Z",
      "typedData": {
        "types": {
          "SetDispatcherWithSig": [
            {
              "name": "profileId",
              "type": "uint256"
            },
            {
              "name": "dispatcher",
              "type": "address"
            },
            {
              "name": "nonce",
              "type": "uint256"
            },
            {
              "name": "deadline",
              "type": "uint256"
            }
          ]
        },
        "domain": {
          "name": "Lens Protocol Profile",
          "chainId": 80001,
          "version": "1",
          "verifyingContract": "0x23C1ce2b0865406955Da08F1D31c13fcc3f72A3a"
        },
        "value": {
          "nonce": 0,
          "deadline": 1645199117,
          "profileId": "0x1d",
          "dispatcher": "0xdfd7D26fd33473F475b57556118F8251464a24eb"
        }
      }
    }
  }
}
Request
Let's touch on this request so it's super clear.
profiled - required
You must pass in a profileId that is mandatory.
dispatcher
You can pass in the dispatcher as per the above to set a dispatcher.
enabled
You can remove the dispatcher by setting enabled: false.
Example in the request as below:
mutation CreateSetDispatcherTypedData {
  createSetDispatcherTypedData(request:{
    profileId: "0x1d",
    enabled: false
  }) {
    id
    expiresAt
    typedData {
      types {
        SetDispatcherWithSig {
          name
          type
        }
      }
      domain {
        name
        chainId
        version
        verifyingContract
      }
      value {
        nonce
        deadline
        profileId
        dispatcher
      }
    }
  }
}
Hooking in without using the type data
You may not want to go down the typed data with the signature route and just send the transaction directly from the client to the blockchain without any API call to map the data for you. You will need to do the encoding and validation yourself if you go down that approach. This is out of scope for the API documentation as would have been explained and showed how to do it in the contract docs. This tries to advise the same practice as what seaport on OpenSea are doing alongside a lot of other projects which tries to improve the visibility of what the user is signing.
Our dispatcher resolver contains:
Using LensClient SDK
You can use LensClient SDK to set the dispatcher. See the example below.
import { isRelayerResult } from "@lens-protocol/client";

// lensClient is an authenticated instance of LensClient

const typedDataResult = await lensClient.profile.createSetDispatcherTypedData({
  profileId: activeProfile.id,
});

// typedDataResult is a Result object
const data = typedDataResult.unwrap();

// sign with the wallet
const signedTypedData = await wallet._signTypedData(
  data.typedData.domain,
  data.typedData.types,
  data.typedData.value
);

// broadcast
const broadcastResult = await lensClient.transaction.broadcast({
  id: data.id,
  signature: signedTypedData,
});

// broadcastResult is a Result object
const broadcastResultValue = broadcastResult.unwrap();

if (!isRelayerResult(broadcastResultValue)) {
  console.log(`Something went wrong`, broadcastResultValue);
  return;
}

console.log(
  `Transaction was successfuly broadcasted with txId ${broadcastResultValue.txId}`
);
Reference
async createSetDispatcherTypedData(
  request: SetDispatcherRequest,
  options?: TypedDataOptions,
): PromiseResult<
  InferResultType<CreateSetDispatcherTypedDataMutation>,
  CredentialsExpiredError | NotAuthenticatedError
>

type SetDispatcherRequest = {
  /** The dispatcher address - they can post, comment, mirror, set follow module, change your profile picture on your behalf, if left as none it will use the built in dispatcher address. */
  dispatcher?: InputMaybe<Scalars['EthereumAddress']>;
  /** If you want to enable or disable it */
  enable?: InputMaybe<Scalars['Boolean']>;
  /** The profile id */
  profileId: Scalars['ProfileId'];
};

type TypedDataOptions = {
  /** You can override the nonce for the sig if you want to do some clever stuff in the client */
  overrideSigNonce: Scalars['Nonce'];
};
Updated 12 months ago